
Tips for Model Railway Photography
by John Sherratt, September 2012
These notes originally appeared as an article in Scalefour News 179. With John’s permission we reproduce them here for the benefit of all modellers, in particular those who are considering submitting photographs for publication in our journal.
The images can also be viewed in a larger format
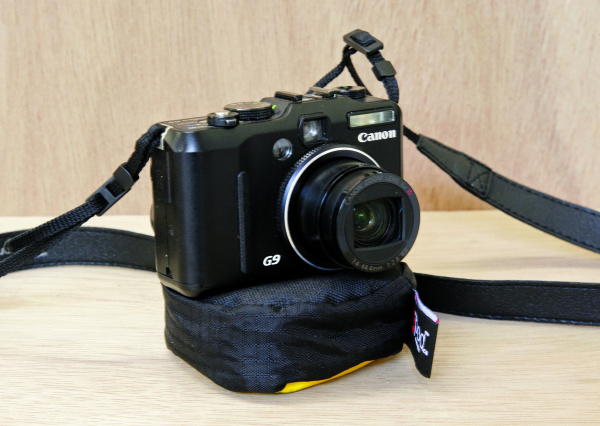
Photo 1: My Canon G9 on a “pod”; a simple and easy way to steady the camera for low shutter speeds
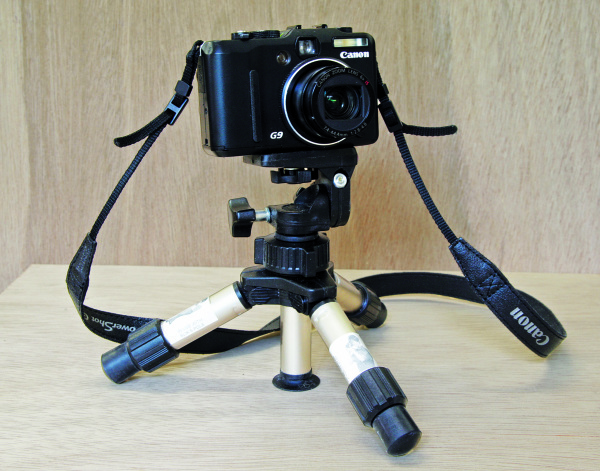
Photo 2: As an alternative, here is the camera on a small “pocket” tripod
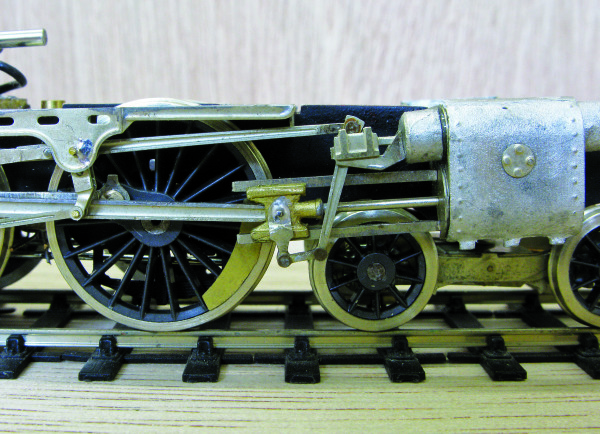
Photo 3: A close up of the valve gear on one of the ‘Black 5’ locos I am building to run on the Manchester Model Railway Society’s P4 layout, Slattocks. A photo can often show up faults that the eye has missed; here it shows that the rear of the cylinder is not quite straight!
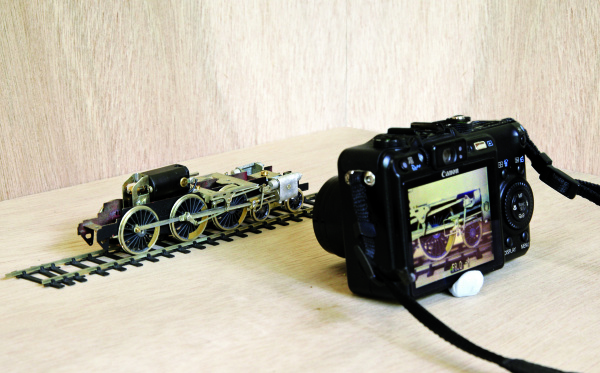
Photo 4: This shows the set up used to take Photo 3. The camera and the subject rest on a sheet of plywood, and a blob of Blu-Tack holds the camera steady at the chosen position. The camera is on its close up setting. This illustrates that when you get the camera this close to the subject, you need to watch out for the camera casting a shadow. Here, the light source is diffuse and soft enough for the result to still be satisfactory, I think. The light is coming from a window, to the right.

Photo 5: Here is my North Stafford Railway ‘Class D’ 0-6-0, pictured on the Central Cheshire Lines. The aperture on the camera is set to f2.8 which is “wide open” to let as much light in as possible. But, this means that the depth of field is quite shallow, so only the front part of the engine in the picture is sharp.

Photo 6: Here is the same view, but the aperture has been changed to f8. Because of the angle of the locomotive to the camera, the bunker is still not completely sharp, but it is a lot better than it was and some of the backscene is now coming into view. Getting the whole of a picture like this sharp is beyond most cameras, and would involve investing in hardware or software that is beyond the scope of these notes.

Photo 7: This shows how Photos 5 and 6 were taken. The camera is resting on the headshunt, with a blob of Blu-Tack to hold it steady. The light is coming from a window to the right, together with fluorescent tubes above the subject.

Photo 8: This is the same scene, but a different view. This is taken with my digital SLR resting on a full size tripod and with the aperture set right down to f22. With a more “side on” view like this, it is easier to get the whole of the picture in focus.
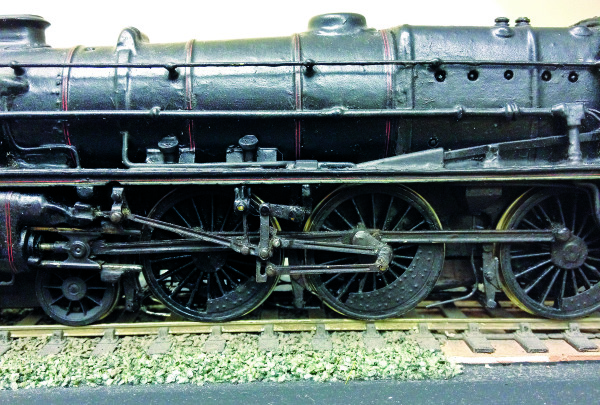
Photo 9: You do not always need a lot of specialized photographic equipment, especially if you can live with a shallow depth of field. This close up of a model of 4767 was taken on my phone! Say it quietly, the model is 00; is it therefore allowed on this website? The real 4767 is one of my favourite locos and yes, I do have the parts to build one in P4 lurking in my “one day” box.
- I recommend a compact digital camera that allows a reasonable degree of control. It should have at least an aperture-priority (sometimes called aperture value) setting, and it will also be useful if there is a fully manual setting and if you can set the white balance. Other useful features are a tripod bush in the camera base, some form of exposure compensation, a self-timer and possibly a macro/close up function.
- Take lots of pictures! It costs nothing until you print them, so take plenty and then you can select the best pictures on your computer.
- Set the camera to a fairly low sensitivity to minimize “grain” or “noise” – say 100 or 200 ISO/ASA.
- Set the camera to the aperture-priority setting, and then select the smallest possible aperture. This is often f8 on a compact camera – the larger the number, the smaller the aperture and the more of the picture will be in focus.
- Where you can, “bracket” the exposure using the exposure compensation setting on your camera. This allows you to adjust the exposure in increments of (usually) a third of a stop – that is, making the picture lighter or darker. Take plenty of photos at different settings – the LCD display on the back of the camera may not accurately reflect how the photo will look on your computer or in a print.
- Support the camera. A small bean bag sold for this purpose at Jessops and other stores is ideal. Otherwise, make your own from a small plastic bag with rice, polystyrene beads or similar in it. As an alternative, you can buy a mini-tripod; a full size tripod will help but can be restricting. Using support like this will allow slow shutter speeds while avoiding “shake” and blurry photos.
- On-camera flash tends not to give the best results, so avoid it unless there is no alternative. Diffused daylight in my experience works best; where you can, keep the source of the light behind you, or close to behind you, but watch out for shadows!
- Using the self timer on the camera will cut down on the risk of camera “shake” blurring the picture, caused by direct pressure on the shutter button when you take the picture.
- Where you can, keep the camera level. Beware of converging verticals caused by the camera being tilted up or down.
- If you can, set the camera so that it is focusing on a point one third of the way into that part of the scene that you need to be in focus – this will make sure that as much as possible of the important part of the picture is sharp.
- Never be afraid to crop the photo so that it concentrates on the main part of the picture.
- If you are serious about taking pictures, some reasonable picture editing software such as Adobe Photoshop Elements (other packages are available) will be very helpful – but can be engrossing at the expense of modelling time!
- Having a neutral background behind the model will make it look better and can save a lot of editing time on the computer! A sheet or a piece of cardboard or hardboard painted a neutral grey-ish colour is ideal.
- A reflector can be useful for directing light to fill in shadows. You can buy these or make your own from cardboard or similar, painted white or covered in silver foil.
- The automatic white balance on your camera will cope with most situations, but if you are taking pictures under fluorescent or tungsten lighting then try using the appropriate white balance setting on your camera. Alternatively, try altering the colour balance in the picture on your computer if you think it doesn’t look quite right.
- If your camera has a macro or close-up mode, experiment with it although you may well find that you do not need this if you are taking a photo of all of, say, a P4 locomotive.